
Quick Facts
Introduction
With a thundering roar, Thok kicks off the final stretch of the last four bosses in the Siege of Orgrimmar. The fight marks a huge increase in difficulty and presents 10-man groups with some setup challenges. On the one hand, you’ll need a third, full-time healer. On the other hand, Paladins are a game-changer for this encounter. If you have two of them, ideally a tank and a healer, it will be much easier for you. If you don’t have any, you should consider recruiting one or levelling up an alt just for this fight.
You can run this fight with one or two tanks, though I consider two tanks to be the safer option for progression. If you decide to solo-tank, you’ll need to develop a cooldown rotation for the tank in Phase 1, since the tank will now have to withstand the tank debuff alone. Keep in mind, however, that you don't gain a full DPS when playing with a single tank, since off-tanks also deal a lot of damage. Also, an off-tank doesn't need as much healing as the additional DPS.
The boss fight consists of two phases that alternate. Phase 1 is a raid cooldown and healer check, and plays out slightly differently each time.
In Phase 2, individual players must run away from Thok. After killing a Jailer, you unlock one of three Prisons,
which introduces new abilities for the next P1 and P2 (Poison, Frost, or Fire). Thok devours one of the inmates and then initiates P1 again.
After ten minutes, Thok goes Berserk. As another Berserk Mechanic,
the fourth kiting phase (P2) lasts until either the boss is dead or your raid. You can no longer trigger another P1 because all the prisons have already
been unlocked, and you can’t trigger another P1 as a result. At some point, he becomes so fast that he devours the entire raid one after another.
Here's a brief overview of the fight, so you can get familiar with some terms and abilities:
- 1. P1: Heal as much and as long as possible.
- 1. P2: Kite Thok, kill the Jailer, unlock the Green Prison.
- 2. P1: Green Prison ability active. Play this phase briefly, kill the bats.
- 2. P2: Kite Thok, kill the Jailer, unlock the Blue Prison.
- 3. P1: Blue Prison ability active. Heal as much and as long as possible, Yeti becomes active.
- 3. P2: Kite Thok, kill the Jailer, unlock the Red Prison.
- -- Ideally, you should have already killed him by this point --
- 4. P1: Red Prison ability active. Play this phase briefly.
- 4. P2: Kite Thok until either he or the raid is dead.
Thok was nerfed at the end of January 2014, so that his Screech and Shock Blast now deal 10 % less damage in 10-player and Flex raids. This nerf is likely active from the start in MoP Classic.
Shock Blast
With one small exception, this ability remains active throughout the entire encounter.
Ability: Shock Blast
In reality, the ability is cast throughout the entire fight; it is only not used during the section of the fight where Thok continuously casts his Screeches, which is roughly 45 seconds after the start of Phase 1. In Phase 2, it becomes active again immediately.
Prison Order
The Prisons work as follows: To end P2 (the kite phase, during which Thok gets faster and faster), you must kill the Jailer that appears and loot a key from him. You can now unlock one of the three Prisons. If you do so, Thok devours one of the inmates and P1 starts over. Depending on which Prison you've just opened, Thok will have different abilities in this P1 and the following P2.
The goal of the strategy described in this guide is to hold onto the first and third P1 for as long as possible and to open the Prisons in a specific order that works best for you. This was the standard strategy back then, though I don't even know if any groups ever deviated from it.
In the first P2, you will open the Poison Prison; in the second, the Frost Prison; and in the third, the Fire Prison.
The idea behind this sequence is that you want to play the first P1 for as long as possible right at the start of the fight,
using all your healing and damage cooldowns, because no additional ability is active yet.
After that, you’ll need a break and a brief P1 without using cooldowns,
for which the Poison Phase is well-suited, since it isn’t suitable for continuous healing due to the appearance of bats dealing AoE damage and a
debuff that needs to be dispelled constantly.
Theoretically, you could also open the Blue Prison first. However, then, you’ve already brought a Yeti into the fight, which is charging back and forth, and second, this phase is better suited for maximum healing than the Poison Phase because there’s no debuff to dispel.
The Red Prison is, without a doubt, at the very bottom of your agenda. Once it opens, players constantly take a fire debuff that leaves behind voids. Even on your first kill, you don't want to end up in this phase.
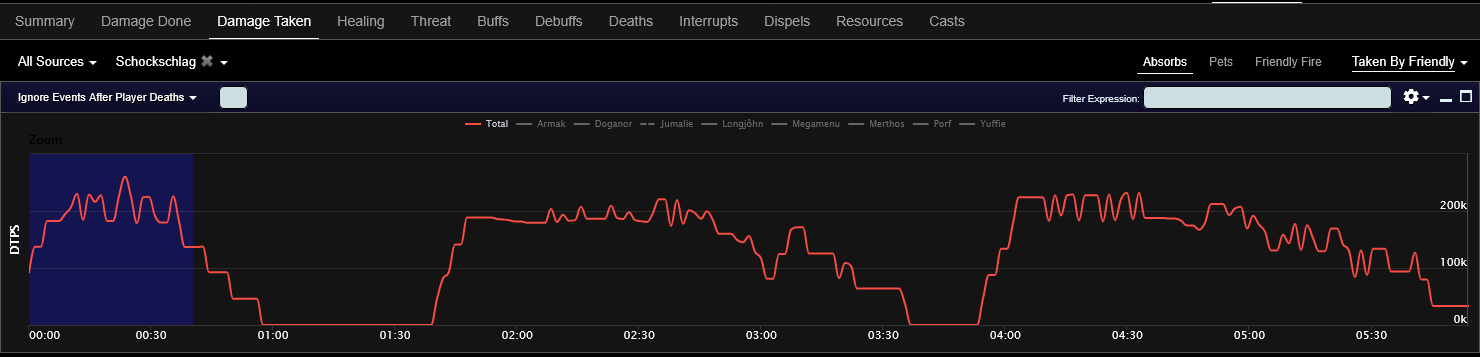
Phase 1: A Cry in the Darkness
Phase 1 demands everything from your healers. Since the phases differ slightly based on the Prisons that were opened earlier, the variations are described below. The goal of Phase 1 is to survive as long as possible, especially in the first and third P1. You can reach a phase-duration of 1:45 minutes if you push it to the limit. Phase 1 is your main damage phase, since in Phase 2 you have other mechanics to deal with and the boss isn’t always within range.
This time, a detailed description of how abilities work is provided in the “Strategy” chapter. The following section describes the basic abilities that are the same in every P1.
Ability: Deafening Screech
- 0:14 1st Screech
- 0:25 2nd Screech
- 0:32 3rd Screech
- 0:38 4th Screech
- 0:43 5th Screech
- 0:45 6th Screech
Ability: Bloodied
If five players have this debuff within 5 yards, Phase 1 ends and Phase 2 begins. The goal is to prevent this from happening too early in Phase 1 through strategic positioning until you end the phase by gathering in a controlled manner.
Ability: Tail Lash
Phase 1: #1 (Neutral)
The encounter begins with this Phase 1. It's called Neutral, because there are no additional abilities yet.
After that, you can control which abilities you receive in the next Phase 1 and Phase 2 by opening prisons in Phase 2.
However, there are relatively few alternatives to the standard order, and the following phase descriptions describe the standard sequence
(Poison > Frost > Fire).
You can find more information in the Encounter Strategy chapter and the Prison Order chapter.
If you’ve brought the boss to 60 % HP by the end of the phase, you’re on the right track.
The additional ability added starting with the second P1 (Corrosive Blood, Icy Blood, or Burning Blood) remains active during the subsequent P2, but disappears again with the P1 thereafter.
Ability: Fearsome Roar
The ability comes every 12 to 15 seconds, meaning it will occur about 7 to 8 times in the first Phase 1 if you play it through to the end. Taunt at two stacks.
It appears in a modified form in every Phase 1 and is always cast in a cone-shaped area in front of the boss; the off-tank must therefore never stand next to the active tank.
Phase 1: #2 (Poison)
Following the standard strategy, you will open the Green Prison in the first P2 and gain modified abilities in this second P1.
Acid Breath replaces the
Fearsome Roar from the first P1.
Taunt again at two stacks, and note that the ability deals significantly more damage this time.
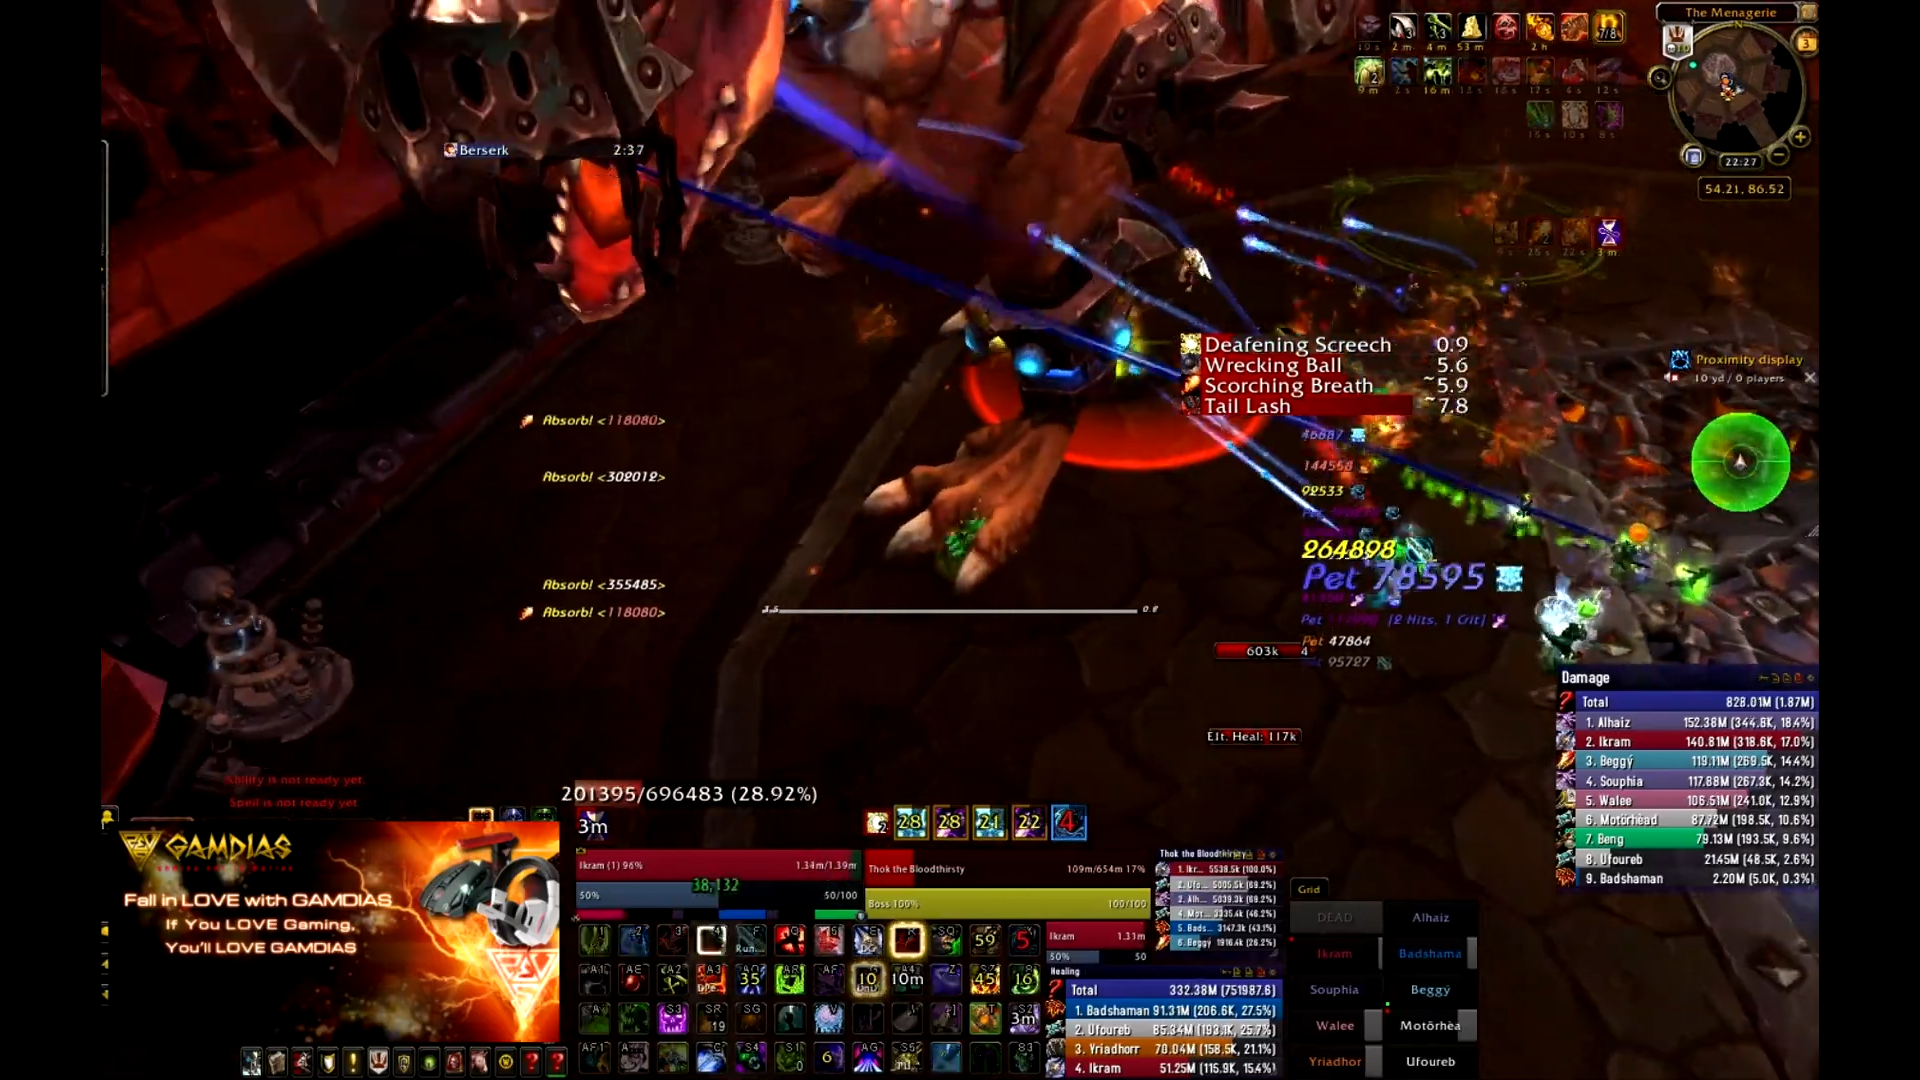
Corrosive Blood is a stackable debuff that initially deals 200,000 damage and ticks for 50,000 damage per second for 30 seconds. While it may look like a poison debuff, it is a regular magic debuff. It is cast on two players every 5–10 seconds. Dispel it as much and quick as possible! Mass Dispel is worth gold. It can occur very close in time to Shock Blast, causing the affected player to take nearly 400,000 damage in a short period. An example taken from a fight in 2014 (all on the same player):
- 3:00 Corrosive Blood (applied): 195.304 damage
- 3:01 Corrosive Blood (tick): 50.000 damage (it got dispelled before it could tick a second time)
- 3:04 Shock Blast: 158.006 damage
- 3:07 Deafening Screech: 369.813 damage
That’s 773,123 damage to a single player in 6.5 seconds. If the debuff hadn’t been dispelled so quickly, the damage would have exceeded one million. So pay attention! You won’t be able to last long in this phase, since you’ll have no cooldowns left after the previous Phase 1. Additionally, after the second Screech, bats will join the fight that need to be tanked and will cause further AoE damage. More on this in the Encounter Strategy chapter.
Phase 1: #3 (Frost)
The main tank attack in this phase is Freezing Breath. This time, it has no armour reduction, but it deals light damage as a DoT and stuns the target at five stacks. It is again a frontal cone effect. If you taunt at four stacks, that should work out. However, you can also let a tank take five stacks. They will then be trapped in an ice tomb, unable to act, and take 5 % of their maximum HP in damage per second. The tank must be freed by the ranged DPS. The ice tomb has very few hit points and you can still heal players inside it.
What was Corrosive Blood (the DoT) in the second Phase 1 is now Icy Blood. It deals 180,000 frost damage and leaves a 15-second, stackable debuff that initially has no effect. If a player reaches five stacks of this debuff, they, too, will be trapped in an ice tomb like the tank. I don’t recall this ever happening to us back then, as it’s cast very irregularly. If you do happen to reach four stacks, don’t stray too far from the group and let everyone know so that ranged DPS can quickly switch targets to you should you get the fifth stack.
Furthermore, a Yeti enters the arena after the boss’s second Screech; he will charge towards random positions on the outer sides of the arena
and deal 1.2 million physical damage if he hits you.
He does not need to be tanked and, as you can read in the Encounter Strategy chapter, should be ignored.
You could kill him, but you’d have to deal 21 million damage, and the size of the arena prevents you from damaging him continuously.
Phase 1: #4 (Fire)
You shouldn't normally reach the fourth Phase 1, or only for a very short time. The cone-shaped tank attack now deals 275,000 fire damage and leaves a stackable DoT that deals 82 k damage per second. The attack is cast approx. every 10 seconds. At the start of the phase, taunt at two stacks, and thereafter, always taunt when your debuff has expired.
The raid will face Burning Blood. Affected players
take 110,000 damage and leave
a pool of fire behind when hit by the ability. Unfortunately, I couldn’t find any information on how often this happens, but it’s safe to assume
that this attack occurs just as frequently as the other “Blood Abilities” from the previous Phases 1. So every few seconds, it will hit two players.
This ability prevents any stacked healing, forcing you to gather quickly after a short time to end the phase.
Source: YouTube
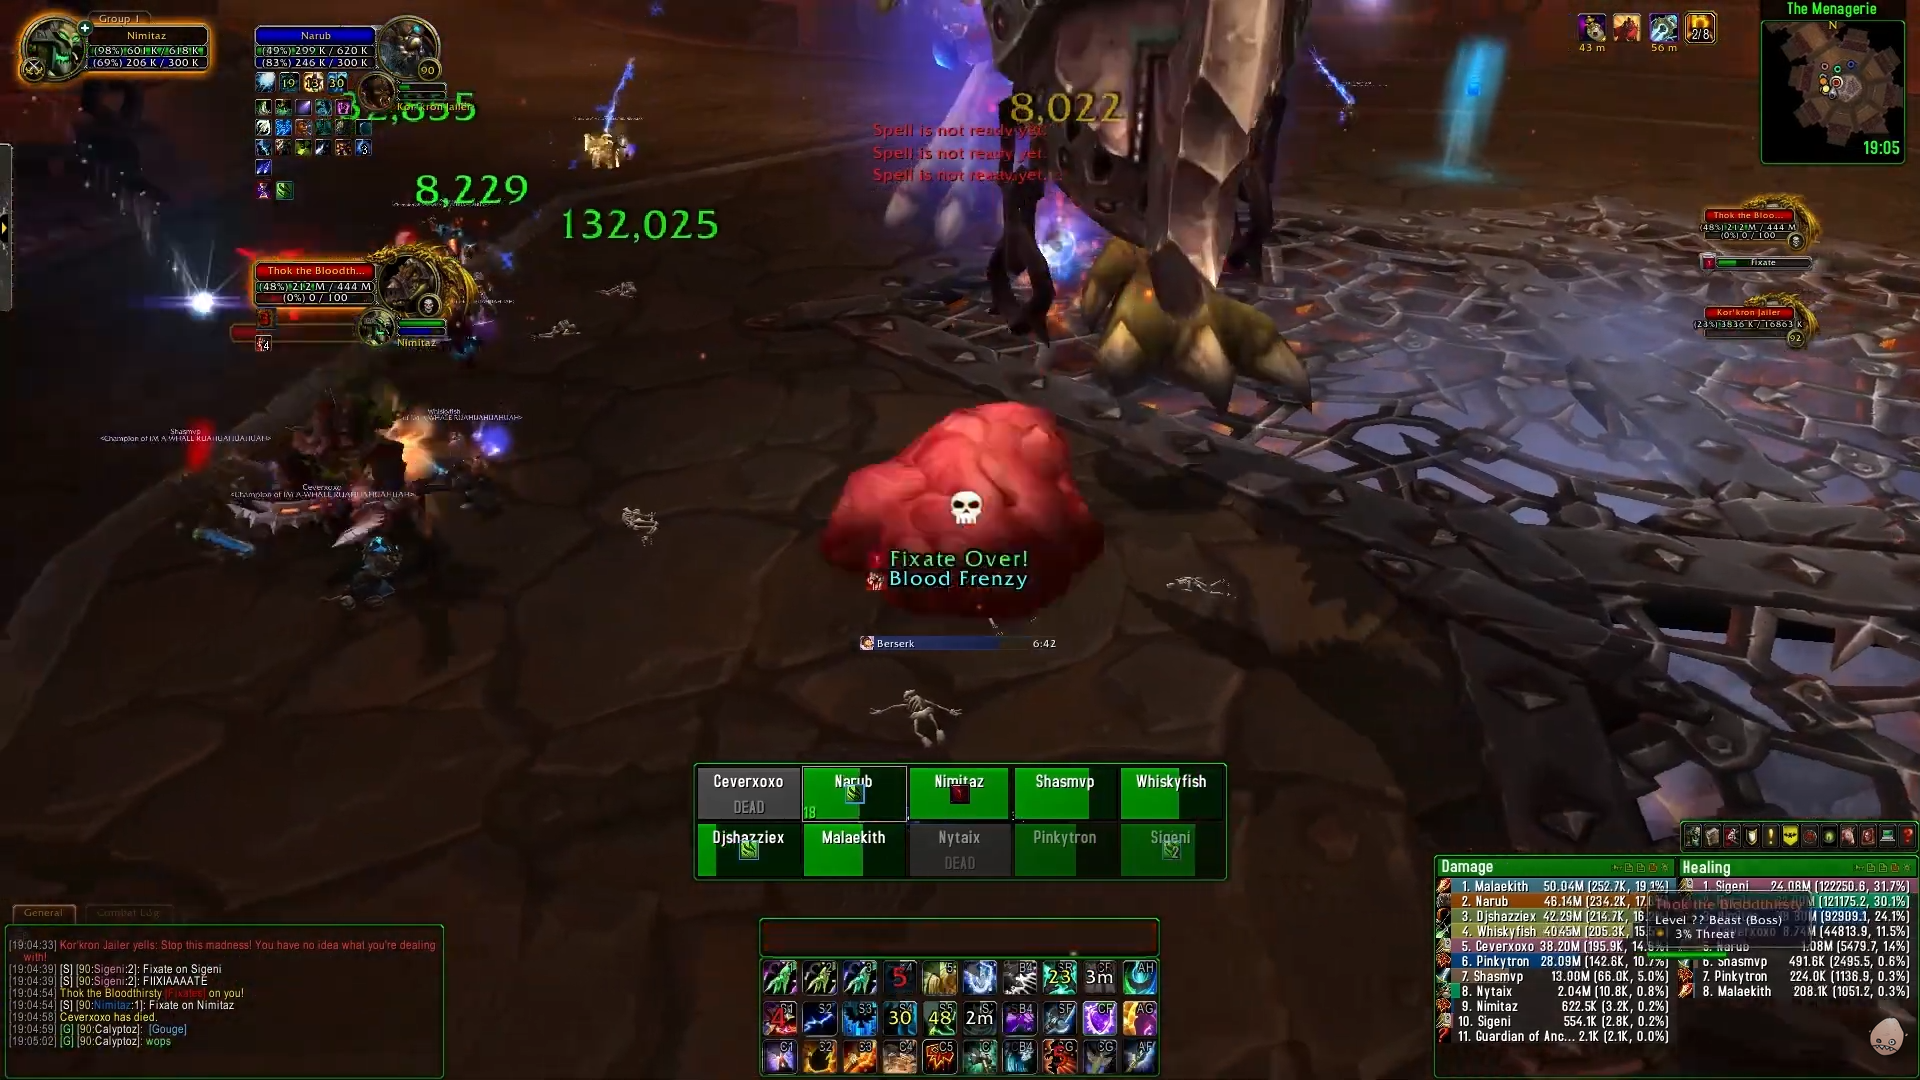
Phase 2: Blood Frenzy!
In Phase 2, you no longer need to tank Thok; instead, he locks onto a single player for 12 seconds at a time and chases them. This is clearly indicated by a red beam pointing towards that player. During this phase, you must not stand too close to the boss, or he will kill you instantly. The targeted players must therefore kite him. Throughout the entire phase, he steadily gains speed, so you’ll eventually have to end it.
Source: YouTube
Thok will target one of the three non-tanks furthest away within a 150-yard radius. After that, he will look for a new target. So you have some control over who gets targeted.
Thok will target one of the 3 farthest non-tank players within 150 yards. Do not be one of those if you don't want to kite
— Ion Hazzikostas, February 7, 2014
During this phase, you will continue to face the Shock Blast and,
depending on which Prison was last opened, the Corrosive, Icy, or Burning Blood. In the first Phase 2, you will only face the Shock Blast,
since you haven't opened any Prisons yet.
A Kor'kron Jailer will run out of the corridor into the arena and must be tanked. He has about 25 million HP and
deals damage comparable to Thok. After his death, a key can be looted from his corpse, which can be used to unlock one of the three Prisons.
The freed mobs will run into the arena; shortly thereafter, Thok will end his fixate,
charge at one of the mobs, devour it, and heal himself for 50 million HP. Use Mortal Strike effects to reduce the healing.
After that, Phase 2 ends and Thok must be tanked again. Depending on which Prison you open, you will have different abilities
in the next Phase 1 and Phase 2.
You can find a “How to run sketch” further down in the following chapter in the description of the first Phase 2.
Encounter Strategy
The following is a detailed discussion of the strategy mentioned above (Poison > Frost > Fire).
1. P1 (Neutral)
Pull the boss to the Green Prison. It’s best to watch the first 30 seconds of our kill video for this. You place the boss there because you’ll be kiting him from that position during the following P2. In many videos, you’ll see the boss being tanked parallel to the wall. However, that requires more running around than simply pulling him straight up to the wall and “parking” him in front of the already positioned group. The first frontal tank attack comes late enough that you won’t put anyone in danger.

Look at the Druid’s healing circle next to the boss. Four players are standing within melee range of the boss at one edge of the circle,
and four more are standing on the opposite side. As a reminder: no more than four players with less than 50 % HP are allowed to be within 5 yards
of each other.
This positioning prevents that from happening. From the main tank’s perspective, the off-tank is standing to the left of Thok.
You need to practice this phase until it works for you. It's not advised to stop
at like 12 Screeches and continue with Phase 2. This will probably lead to more problems later, since you need
to play Phase 1 as long as possible. Practice and evaluate your cooldown rotation!
If positioning and cooldown management have been discussed thoroughly, you should now be able to heal 27 or even more Screeches. Your cooldown rotation is highly individual and cannot be covered in detail here. Assign all available cooldowns and make sure they’re used when needed, every little bit helps. Three-minute cooldowns will be available again during the second big healing phase, and five-minute cooldowns may also be ready again if you play optimally beforehand.
Here is a functional breakdown from back then (this is not the one from our kill video):
- 05: Holy Paladin cooldowns
- 07: DA Holy Paladin
- 13: DA Prot Paladin
- 15: HoP on Shaman (use additional cooldowns)
- 18: All non-tanks into the melee group, Smoke Bomb
- 19: HoP on Resto Druid > Tranquility
- ~ 27: End the phase
DA: Devotion Aura
HoP: Hand of Protection
Thanks to the two Devotion Auras and the subsequent HoP cast on the Shaman, the Shaman can sustain healing for a very long time without having to pay attention not to get interrupted. It is crucial that your healers have a buff tracker for these interrupt-preventing abilities. The players also used their other healer cooldowns as needed. The Holy Paladin’s Divine Shield, for example, is not explicitly scheduled.
We always timed it so that we grouped up after the 18th Screech, since the following
Smoke Bomb combined with Tranquility stabilized the group for a while.
Combined with the healing from the other two healers, this always worked very well up to 27+ Screeches.
Since you are now standing together with 8 players, you can trigger Phase 2 by briefly reducing your healing.
If you have a Spirit Link Totem available, don't wait too long to cast it. It could throw a wrench in your plans if you're trying to trigger Phase 2.
Remember to stop healing early enough and only treat emergencies so that you trigger Phase 2. Otherwise, if you have a reasonably good setup, good cooldown management, and a bit of practice, you could easily heal over 30 Screeches, which will wipe your group instantly.
If you don't have a Paladin available, you might have to stop a bit earlier. It's doable, but you probably will get to see the fourth Phase 1 (and the fire voids).
1. P2 (Neutral)
The goal of every Phase 2 is to kite Thok for as long as possible, kill the Jailer that appears, and loot his key. As soon as Thok starts moving too fast,
you unlock a prison cell. However, you don’t have to decide this on the fly, it’s planned in advance.
After opening a cell, Thok continues his fixate for about 12 seconds
and then runs to one of the prisoners and devours him. Before he devours him, a Mortal Strike effect must be on the boss; otherwise,
he heals for 50 million.
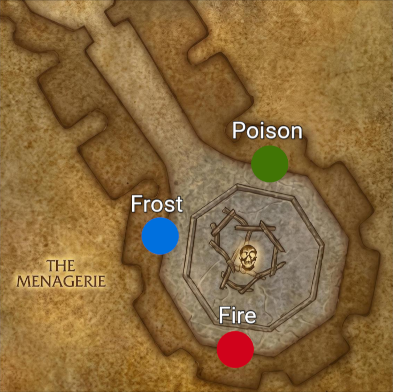
In this phase, you unlock the Green Prison where you started the fight. Tank the Jailer in the middle of the arena.
Each of these phases plays out very similarly; the only differences are the debuff you’ll have on you starting from the second P2 and the starting position for kiting. Kite the boss as follows.
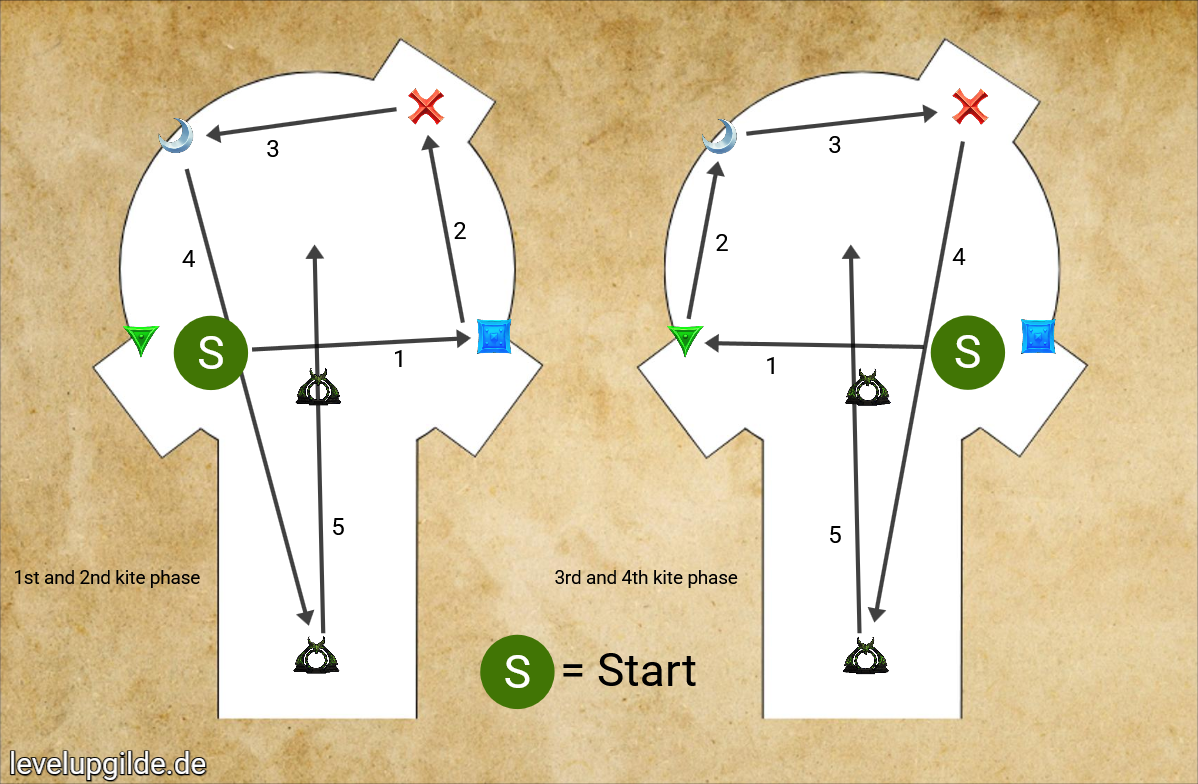
The starting point for your kiting is the green circle; each arrow represents a 12-second fixate on a player and the direction in which the fixated
player kites Thok.
For orientation, you can place world markers at the corresponding ending points of a kiting run. A Warlock’s Gate will help you run down the corridor.
In this specific Phase 2, you run from your starting position at the Green Prison over to the Blue Prison, then to the red one,
then to the area of the room without a Prison, then down the corridor (use the Warlock Gate), and let Thok run back up the corridor.
Open the Prison when Thok has just finished his fourth fixate and is down in the corridor.
The arrows indicate Thok’s path, not necessarily a player’s path. This means that before the
fourth fixate, you don’t have to stand by the Moon Marker, but can already be at the upper Warlock Gate, ready to use it if you get fixated.
Similarly, during the fifth fixate, you don’t stand at the Warlock Gate deep in the corridor, but in the middle of the arena and, if necessary, pull Thok
up through the room.
2. P1 (Poison)
You'll tank the boss at the same spot as before. Since you just opened the Green Prison, starting with the second Screech, you’ll be dealing with seven bats
that appear nearby and occasionally cast Vampiric Frenzy,
which deals some raid-wide damage and heals them slightly. They can be stunned, so establish a rotation.
Each has about 10 million HP. Focus them immediately. The tank taking the bats should first pick up a debuff stack
from the boss and will then get the boss taunted off them.
You can now tank the bats in the camp near the boss, even if this results in five players standing close to each other. Normally, you should have killed the bats
and more or less automatically transition into the next Phase 2 at the same time, since you don’t use any healing cooldowns in this phase.
If you enter Phase 2 too early, the bats might cause you too many problems while you’re already kiting the boss and the Jailer appears.
If necessary, have a ranged DPS position themselves off to the side so that there are only four of you standing together again.
After about 7–10 Screeches, you should transition to P2.
Also, players will regularly receive the Corrosive Blood debuff, which you should dispel as quickly as possible.
2. P2 (Poison)
When kiting, proceed exactly as you did in the previous P2. Keep in mind that you can receive the Corrosive Blood debuff while kiting, so save your personal cooldowns for that, and, if available, a Health Stone. At the end of the fourth fixate, open the Blue Prison and start tanking Thok there.
3. P1 (Frost)
Here, you’ll want to go all out again. Once you’ve healed through the first Phase 1 and played the kiting phases long enough,
it should now be well over 5 minutes into the fight.
You’ll be dealing with Icy Blood, so make sure to free your tanks if they get frozen. If you get four stacks
of the debuff, announce a possible freeze of yourself in voice chat.
On the second Screech, a Yeti will appear, who will then race through the arena and charge from edge to edge across the room at random points.
If you stand in his path, you will likely die. If you tank the boss at the spot shown in the image below, the Yeti will almost never charge at you
(probably because it’s close to the corridor in the direction he never charges). Of course, still keep an eye on him.
You can kill him, but that only unnecessarily prolongs the fight, and you want to be dealing damage to the boss during this phase.
Use the same cooldown rotation as in the first P1.
3. P2 (Frost)
You'll still be dealing with the Yeti and Icy Blood here, though it's less dangerous than the previous DoT. You'll now kite Thok in the opposite direction from before. After the fourth fixate, open the Red Prison.
4. P1 (Fire)
You start the phase at the Red Prison, but you’ll be constantly pulling Thok towards the Blue Prison because of the fire voids.
Here, you need to spread out a bit right from the start, since you’ll constantly create fire under your feet. How long you can last through this phase,
you’ll have to figure out with your healers. As mentioned a few times already, the boss should be defeated by this point at the latest.
Otherwise, you’re dealing too little damage, playing the first and/or third P1 too short, or ending the kiting phases too early.
It’s advisable to briefly regroup after the sixth Screech at the latest and initiate the next and final P2.
Pay special attention to the Yeti here, as you’re further into the room than usual.
4. P2 (Fire)
This is the soft enrage phase. You no longer have a prison you can open to end the phase.
In this phase, you’re still dealing with the Yeti and the constantly appearing fire voids.
The only difference here is that, starting with the sixth fixate, you’ll have to frantically kite the increasingly fast Thok back and forth
up and down the corridor until you hopefully manage to kill him.
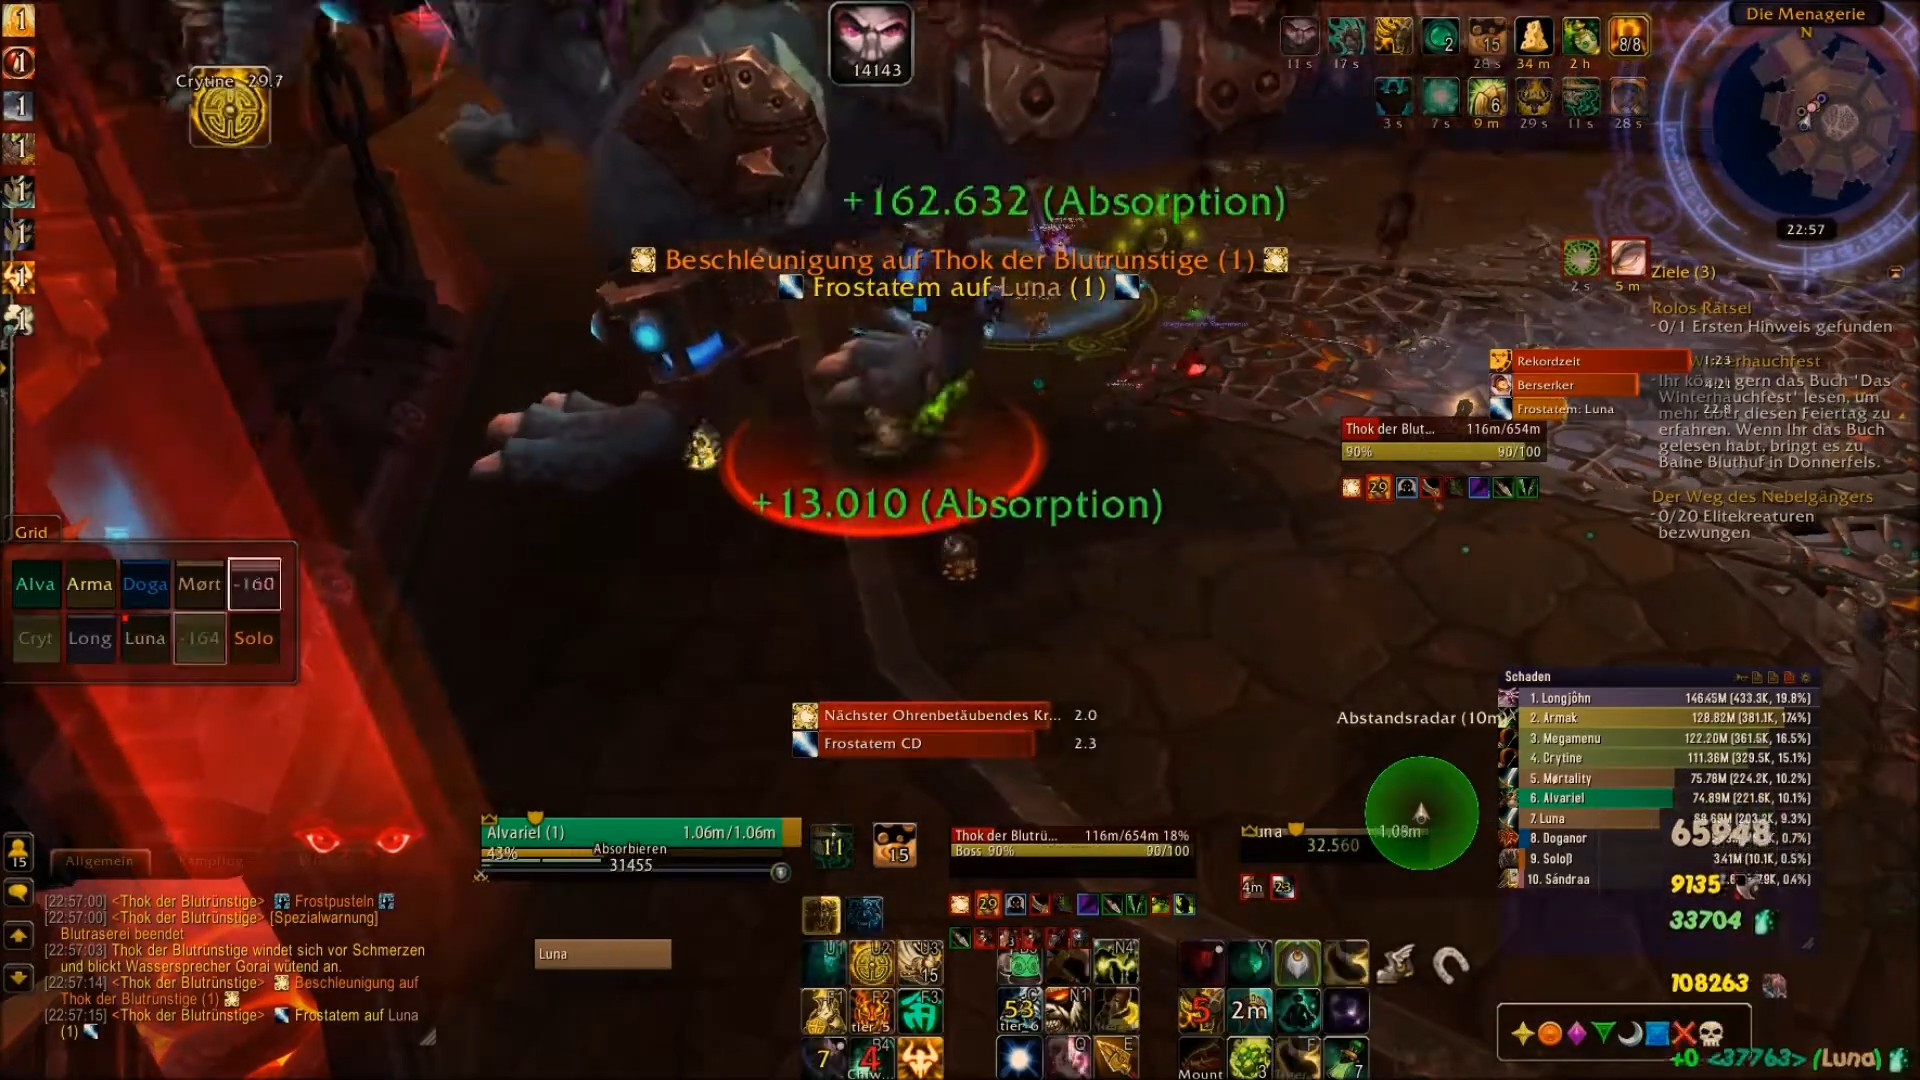
Kill Video
This video shows our fourth kill on January 22, 2014, from our Brewmaster's perspective.
Common Reasons for Wiping
- Kiting: You need to have seen the kiting phase a few times so you can judge the distances well. Keep in mind that it’s not always 100 % the same. If you're being fixated and get eaten, it throws off the kiting process because Thok will refix on a player at an unplanned position.
- Cooldown Rotation: Planning this in advance of the raid is essential.
- Debuffs: You need a Plan B for dealing with a debuff while kiting Thok away from the group.
TL;DR
- Set up your healing cooldown rotation in advance!
- Heal through the first and third P1 until just before 30 Screeches, the second only until around the 7th–10th, and the fourth (which shouldn't happen) until the sixth.
- 2nd P1: Focus on the bats immediately upon their appearance. 3rd P1: Ignore the Yeti, but keep an eye on it.
- Tank the first and second P1 at the Green Prison and the third at the Blue Prison at the entrance to the corridor (Yeti safe spot). Tank the fourth P1 at the Red Prison, then slowly move towards the Blue Prison as more and more voids appear.
- Always taunt at two stacks (except in the Frost Phase, where it’s four). Thok has a frontal attack – no one except the active tank stands in front of Thok!
- Check out the kiting sketch above.
- Keep an eye on your own debuffs while kiting.
- Kill the Jailer that the tank is tanking in the centre of the arena.
- Starting from the third P2, watch out for the Yeti!
- Order for opening the Prisons: Green > Blue > Red.
- Open the Prison as soon as the final fixate of a P2 according to your plan begins. It will then take about 12 seconds for Thok to stop fixating and devouring the prisoner.
- Apply a Mortal Strike effect to Thok before he eats the prisoner!
Class Tips: Priest (Discipline)
As the interval between the Deafening Screeches decreases, it becomes increasingly difficult for you to cast healing spells.
Make sure you’re standing in the back camp and use
Divine Star; it’s very powerful in this fight.
If Devotion Aura is cast, or you receive a
Hand of Protection, have a plan for
what you want to do while it's active,
such as using Spirit Shell.
Also plan to cast Inner Focus
so you can cast two Prayers of Healing during its duration.
If you use Penance or
Smite, that will fit in between two Screeches.
If you don’t have mana issues, you can also shield your way through the entire phase using
Power Word: Shield.
During the debuff phase (Corrosive Blood), you should use Mass Dispel.
Place Feathers
along your agreed-upon kiting paths before the fight and keep refreshing them.
Since Holy Priests received significant buffs in MoP Classic, it’s a great choice for this fight thanks to its incredibly powerful group healing. Consider switching specs. In this fight, you can only fully utilize the Discipline Priest’s strengths to a limited extent.
Class Tips: Rogue
Use Cloak of Shadows
to remove debuffs while kiting. You can also
glyph it to gain a brief
40 % damage reduction for Phase 1.
Be sure to skill Elusiveness
and use Feint consistently if you need to kite. Also, use Feint
if you have low health in Phase 1.
Using Burst of Speed, you can
stick to the boss during the kiting phases, provided the Jailer dies early enough. Thok will not fixate you, if you're next to him.
Use Glyph of Killing Spree for Phase 1, so
the boss's Tail Lash won't hit you.
During the kite phase, Shadowstep and Killing Spree are deadly when used against the boss, because, contrary to their tooltips (“[...] appear behind a target [...]”) you get eaten anyway.