Quick Facts
Introduction
Garrosh is by far the biggest challenge in Classic WoW so far. Back then, Paragon needed 600 attempts in 10-man, including a switch to solo-healing.
The 25-man raid can really show its full strength here thanks to the many off-cooldowns, and can also plan for an extra tank
whose sole purpose is to kite adds indefinitely so you don’t have to worry about them.
The fight is very long and has many phases with different abilities that test various disciplines. Solo-healing is indeed an option, and not
just for Paragon, but it’s not recommended for your first attempts.
Garrosh's 227 million HP may not seem like much, but he heals himself several times, which ultimately results in 1.35 billion damage to Garrosh alone!
The fight is straightforward to practice, as there is hardly any randomness involved, much like with the Klaxxi. Compared to Normal Mode mode, the transition
phases occur in a fixed order.
During these transitions, Garrosh builds up energy. You must absolutely complete the first transition before he reaches 25 energy.
His abilities get empowered based on his energy level, which is something you want to delay.
A Druid is invaluable because of Stampeding Roar and classes with AoE stuns and silences are also well-suited for this fight.
Phase 1
In Phase 1, you'll face adds and Iron Stars. Except for the thrown weapons, the other abilities and adds are exclusive to Phase 1.
Ability: Desecrate
As long as at least three players are at a distance, Garrosh will always throw his weapon at one of these players. Upon impact, the weapon deals 200 k damage and then deals the same amount of damage every second via Desecrated.
The weapon can be destroyed; it has approximately 8 million HP. The fewer health points it has, the smaller the void becomes.
This ability will be used several times during the fight. You will place the first void in the camp and destroy it immediately. You will place the others outside and slowly destroy them with DoTs so that they free up the space they are occupying.
Ability: Hellscream's Warsong

Add: Kor'kron Warbringers
They also use Hamstring, which slows you down by 50 %.

Add: Farseer Wolf Rider
The Chain Heal heals multiple enemies for 60 % of their HP and must never be allowed to go through. The same goes for Chain Lightning, which otherwise deals 450 k damage to multiple targets. For every spell interrupted, the Farseer gains 25 % cast speed. So he must not be allowed to live too long, otherwise you’ll have trouble interrupting him or may even have to let a Chain Lightning go through so you can still interrupt the healing.
He must be tanked, but deals negligible damage.

Add: Siege Engineer
Once the Engineers activate their Star, they no longer need to be killed and will disappear.
Position yourselves as shown in the following sketch.
Tank Garrosh roughly in the middle of the room. Right at the start of the fight, he’ll summon six Warbringers,
which you’ll kill very quickly using your cooldowns and trinkets. You don’t need to be cautious here yet, and you can
tank them when they lock onto you.
Group up directly behind Garrosh so that his thrown weapon lands on you, and gets killed by your cleave damage along with the adds.
A Priest with Spirit Shell or a Paladin with pre-stacked
Mastery are very well-suited for absorbing the
incoming damage from the void and the adds.
It is important that the adds die before Garrosh casts
Hellscream's Warsong.
The upcoming Siege Engineer can be taken down by a Warlock alone if they prepare accordingly.
To do this, they must deal approximately 3 million damage in 10 seconds.
If you stand with your back to Garrosh’s throne as shown in the sketch above, you’ll kill the left Engineer both times. Place a
Demonic Gateway in the direction of the Engineer for the outbound trip and a Warlock Portal for the return trip.
At the same time the Iron Star on your right, where you let the Engineer live, starts moving and
a Farseer Wolf Rider will come running from the left. Make sure no one gets too close to him
(especially the Warlock who just killed his Engineer and is running back to camp). If you pull aggro on him beforehand,
he’ll stop and start casting.
The Farseer Wolf Rider will run into the rolling Iron Star and lose 50 % of his HP, which saves you 10 million damage and a few interrupts.
Interrupt all of his spells and focus on him. Normally, he only gets to cast twice.
Assign a cooldown for the Star's explosion. The explosion is also the cue for three of your ranged players to move towards the throne
to place the next thrown weapon there. You don’t want it in the group this time. Passively destroy it with DoTs.
At the same time the void appears, six new Warbringers join the fight, and new Siege Engineers also appear.
Unfortunately, this time Garrosh casts his Warsong just a few seconds after the adds arrive, and you no longer have enough power
to kill them beforehand. DPS must not let the adds hit them under any circumstances. You might be able to withstand one or two hits,
but you’ll die if you simply tank them like in the previous wave.
Your goal is to briefly kite the adds and kill them with the help of the next Iron Star. To do this, you’ll need to work out a CC rotation.
One option would be a kick into the Star’s path followed by a mass stun that ends in a root (like Frost Nova). In
our kill video, that didn’t work. This shows it’s possible without it, but using the Star saves you
a lot of damage from the adds. Before the next Farseer Wolf Rider appears, you should bring Garrosh down to 10 %, otherwise you’ll have to
kill him as well. After that, the phase ends and all timers stop.
Use another healing cooldown for the upcoming explosion of the Star.
- 0:00 Six Warbringers spawn far out.
- 0:10 The Warbringers arrive in your group. Two seconds later, the weapon gets thrown inside you.
- 0:20 The Siege Engineers appear. Kill the western one (if you have the throne behind you, this is the left one).
- 0:22 Hellscream's Warsong is cast, but the adds should already be dead.
- 0:32 The Farseer Wolf Rider appears, and at the same time, the Iron Star sets off. Leave the Farseer Wolf Rider alone for now; he will then run through the Star and lose 50 % of his HP!
- 0:41 The Star explodes. Three ranged players head towards the throne to place the next Desecration (weapon) there.
- 0:52 The second Desecration is cast.
- 0:55 Six new Warbringers arrive at the camp.
- 1:04 The Warsong is cast, but the adds are far from dead. Don't let them hit you!
- 1:05 New Siege Engineers appear. Kill the one in the west again.
- 1:15 At this point, Garosh's health should be around 10 %, so that he triggers the next phase.
- 1:22 The Star rolls past the front of the camp. Either kick the adds in there or root them beforehand. If you haven't triggered Phase 2 yet, a Farseer Wolf Rider will appear. You should definitely avoid that.
- 1:26 The Star explodes.
- 1:45 After some role-playing and Garrosh's standard melee attacks on the tank, you're dragged into the transition phase.
Your strategy shouldn't differ much from the one above; otherwise, you'll run into problems later due to low damage or sloppy execution. This and all later phases are choreographed; each player can review them in detail beforehand and memorize them, so everyone knows exactly what to do and when.
Transition Phase 1: Temple of the Jade Serpent
You will be pulled into the Temple of the Jade Serpent and appear where the second last boss of the instance normally stands.
Garrosh initially remains invulnerable in the final boss room and gains one energy point per second.
Key objective of this phase: Garrosh must not exceed 24 energy,
because once he reaches 25 energy, he gains the ability
Empowered Whirling Corruption in the next phase,
which would spell your doom.
To stop Garrosh from accumulating energy, you must kill all the adds, which are scattered throughout the temple in groups of three.
After that, he becomes vulnerable and deals constant high AoE damage until the end of the phase. The phase lasts one minute.
The adds are positioned as follows.
This phase required a lot of coordination on our part. Since you want to kill all the adds as quickly as possible so that Garrosh stops building up energy, you have to trust each other. There won’t be much time for spontaneous coordination. Use Stampeding Roar and Drums of Speed if you have a Leatherworker in the group (the effects stack!).
In our group, adds 1–3 and 4–6 were handled by the tanks and an additional DPS.
The off-tank must taunt just before the transition to the Garrosh phase so that they have some vengeance.
The remaining ranged DPS can also cast a spell on the two camps as they pass by.
Adds 7-9 should go down very quickly, since there are seven of you there. After that, split up between the two remaining camps.
The adds are stationary and deal low melee damage. They also cast
Embodied Doubt, which you must interrupt.
It deals 150 k raid-wide damage and increases the damage from this ability by 75 % via a stackable debuff. You’ll be able to survive one or two
spells getting through, but after that it becomes lethal very quickly.
Ideally, no one should have to interrupt an add individually, as stuns and mass silences make this unnecessary. Nevertheless, assign each player an add
to interrupt or re-stun in an emergency. Each of the adds has 3.08 million HP.
The dead adds spawn 2–3 small domes that land on the ground and can be triggered. If a player walks through a dome, it disappears
and all players standing next to it receive the positive debuff Courage.
This debuff reduces the damage you take by 50 % for the rest of the transition phase, which will become important shortly.
These domes cannot spawn from adds 1–6.
In the worst-case scenario, only two domes appear in Camp 7–9 (in the hallway). However, since you need to move through the phase quickly, you can’t coordinate
and wait until all players are standing next to a dome to get the debuff. Just chalk it up to bad luck; it happens very rarely.
The ideal scenario is for the domes to spawn only from the last two camps. Announce this in voice chat and just stand next to them for now.
Once all the adds are dead, Garrosh will stop generating energy, pause briefly, and then unleash his first AoE strike.
That is the moment when you run into the domes. You’re working together very well if Garrosh has less than 21 energy after the phase, meaning you’ve all
killed the adds within 21 seconds.
Note that adds do not spawn domes if they were silenced before they died, so only use these effects on “fresh” adds.
For the rest of this phase, Garrosh will deal a massive amount of AoE damage with
Annihilate. It is a cone-shaped attack
that targets a random direction and is cast every 3.5 seconds. If you stand in it, you’ll take over a million damage. But even otherwise,
the entire raid will inevitably take 700 k damage from it. That’s why it’s important that you’ve picked up the Courage debuff beforehand, so
you can halve that 700 k damage.
If 1–3 players have not received the debuff, this is handable but requires close attention from the healers.
Tanks can repeatedly stand in the effect to gain a high amount of vengeance (650 k+).
After one minute (as indicated by the duration of your debuff), you will be pulled back into the previous room.
Phase 2: Part 1
In this phase, Desecration (the thrown weapon) returns, along with three new abilities. It ends when the boss is at 10 % health. After 2:25 minutes, you’ll be pulled into the next transition phase. You can theoretically skip this if you bring Garrosh down to 10 % health before that. With enough gear, this is a realistic goal, but probably not on your first few kills.
Ability: Whirling Corruption
Ability: Touch of Y'Shaarj
Ability: Gripping Despair
During this phase, position yourselves as follows.
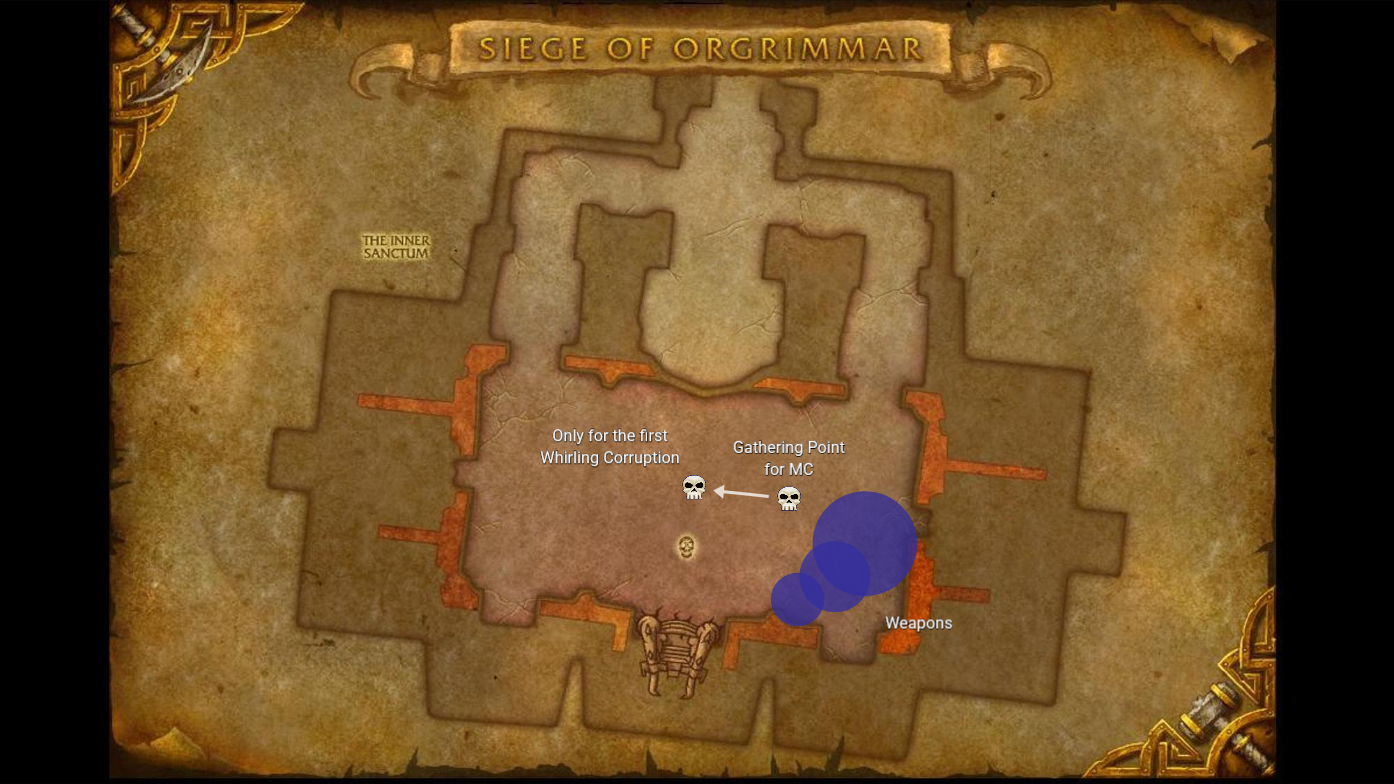
Immediately after the phase begins, pull Garrosh to the “MC Gathering Point.” It’s best to place a world marker there.
For the first Whirling Corruption, pull Garrosh to the centre of the room so your ranged DPS can continue attacking
and then pull him right back. You can find the exact sequence in the following plan.
It’s important that each weapon is placed outside next to the previous one, and that all players stand inside the boss during every Mind Control so the
tanks can immediately get them out with their Revenge. To prevent the weapons from taking up too much space, you should apply DoTs to them in between.
After a few attempts, you should know whether you want to use cooldowns for Whirling Corruption or not,
but the damage is manageable if the raid stays at a distance.
- 0:00 Immediately pull the boss to the MC Gathering Point. Three designated ranged players (ideally a Hunter with two healers) should move to the edge, as shown in the screenshot above, to bait the next weapon.
- 0:09 The weapon is thrown at the players. They then immediately run toward the boss.
- 0:14 Two players will be mind controlled. If any players are still standing outside, the DPS must target them immediately. After dealing with the targeted players, the boss is pulled to the centre of the room. The remaining players stay where they are. Melees who can withstand the Whirling Corruption even at close range (such as Rogues) can remain near him during his cast.
- 0:31 “Whirling Corruption” is cast. Afterwards, the boss is immediately pulled back to the MC Gathering Point. The three-person team moves to the edge of the first weapon to place the next one.
- 0:47 The next weapon is thrown. The three players run back to the boss.
- 1:00 Mind Control. After this, all ranged players move to the edge of the weapon to play the Whirling Corruption there.
- 1:22 Whirling Corruption.
- 1:29 Immediately after the Whirling Corruption, the weapon is thrown. All players run back to camp.
- 1:46 Mind Control. All ranged players then return to the edge of the weapon.
- 2:05 The weapon is thrown.
- 2:12 This time, players don't run towards the boss; instead, they move sideways to the edge of the weapon, since the boss immediately follows up with Whirling Corruption. Healers need to quickly heal the group back up, since running out of the weapon always deals some damage and the Whirling Corruption starts right after that.
- 2:25 Transition Phase 2 starts.
This sequence is the same for every fight. You’ll save yourself a few tries if every raider knows it ahead of time.
Transition Phase 2: Terrace of Endless Spring
This phase plays out similarly to the previous transition phase. You can watch it starting at 5:22 in our kill video.
This time, you’ll be running along a miniature version of the Terrace of Endless Spring. You start at Tsulong and run up the stairs to the Sha of Fear,
where Garrosh is waiting for you again with his AoE attack after you’ve killed all the adds.
Along the way, 36 small Sha adds await you, which again drop domes/orbs upon their death.
However, these are significantly smaller this time and only apply the Courage debuff to the player who runs through them.
In this phase, it’s much easier to ensure that every player receives the debuff.
Use Stampeding Roar and Drums of Speed again and send your tank ahead. Run through. No one deals even a single point of damage except the tank,
who pulls the small adds. As you move through the area,
voids
appear on the ground that deal 400,000 damage on contact and cause you to be feared away for three seconds.
So use Tremor Totems and a Fear Ward on the tank, if available.
If you have the Courage debuff, you are immune to the voids’ fear effect, but not to their damage.
Once you reach the top, pull all the adds together, stun them 2–3 times in a row, and blast them away.
Use cooldowns on your tank; they will take a lot of damage. Make sure no player walks through more than one yellow orb. The effect
is stackable, but you should prioritize ensuring every player gets an orb.
Once all the adds are dead, the voids disappear and Garrosh attacks you exactly as he did in the first phase.
If you were quick in Phase 1 (~21 energy) and Garrosh stays below 50 energy here, you won't face the Empowered Mind Control until Phase 3, rather than during the rest of Phase 2 when you're pulled back down. However, this is nowhere near as important as staying below 25 energy during the first transition phase.
Phase 2: Part 2
You should now have Garrosh down to 30 % or lower. He will likely have more than 50 energy in your first few kills. This means that three of his abilities are now empowered: his Whirling Corruption, his Desecrate, and his Mind Control. First, pull him back to your usual Mind Control Gathering Spot and have the three players bait the first Empowered Weapon of the phase. With the Empowered Weapon, the only change is that you can no longer destroy it, and eventually you’ll run out of space because you can no longer reduce its size through damage. The three players must then immediately return to the boss, as the Empowered Mind Control is cast.
Ability: Touch of Y'Shaarj (Empowered)
After the Mind Control, which you should deal with as quickly as possible, pull the boss to the centre of the room, just as you did at the start of Phase 2. The raid should spread out around the Mind Control Gathering Point, maintaining a distance of at least 8 yards to each other, so that healers can keep the entire raid within range. The first Empowered Whirling Corruption is about to begin.
Ability: Empowered Whirling Corruption
By default, the adds deal about 100 k damage every 1.5 seconds. Each player should kill the add that spawns on themthemselves if possible and then look to see where help is needed. Due to these circumstances, you can no longer group up for the Whirling Corruption; instead, you must spread out around the boss. Be sure to assign major healing cooldowns for that. The Tranquility of a Balance Druid is worth its weight in gold here.
Now the next weapon will get thrown, while the last few adds are likely still alive. But since you’re spread out, this shouldn’t be a problem.
After that, deal with the Mind Controls and bring Garrosh down to 10 % before the next Empowered Whirling Corruption. If it
does happen to come, you’ve got a problem, because that’s a sign you’re not dealing enough damage. According to the plan, you’ll only face two
Empowered Whirling Corruption throughout the entire fight.
Once Garrosh is at 10 %, use Bloodlust and deal as much damage as possible, because you want Phase 3 to be as short as possible. The damage
you deal to him during his transition to Phase 3 will remain in Phase 3, since he heals for a fixed 175 million HP and not by a
specific percentage.
Phase 3
Garrosh mutates and now has 100 energy, regardless of how you performed in the previous phases. This means that the tank debuff is now also stronger. At the start of this phase, Garrosh is likely at around 25 %. This time, it’s not enough to bring him down to 10 %, instead, he won’t trigger Phase 4 until he’s at around 1.7 %. Garrosh deals massive damage to tanks in this phase; hits of 900 k before mitigation are nothing out of the ordinary. There’s no shame in tanks and healers needing a few attempts to adjust.
Ability: Empowered Gripping Despair
For each stack that expires, an additional debuff stack remains on all players that increases the damage of subsequent explosions by 30 % per stack. You can still taunt at 3 stacks each. It’s possible that the boss becomes taunt-immune during this phase; in that case, you’ll need to hold him a bit longer and inform the healers that the explosion will be more damaging.
If one tank dies here, the other tank (using cooldowns if necessary) can continue tanking alone for a very long time. Just be aware that when his debuff expires, the group will take a massive amount of damage due to the many stacks exploding at once.
The following sequence begins with the first weapon in P3.
- 0:00 Garrosh is still standing in the middle and has just become active. Place the first weapon at the Mind Control Gathering Point, it’s no longer needed to keep it free from voids. Then run straight to the boss.
- 0:07 Mind Control. After that, pull Garrosh to the void-free side of the room before the next Whirling Corruption, to the opposite side of the Mind Control Gathering Point. The group stays in the centre.
- 0:23 Empowered Whirling Corruption.
- 0:34 The weapon gets thrown. However, you’ll still be dealing with your Corruption adds and will be standing away from the boss, so you won’t need to reposition yourself specifically for the weapon. Immediately after the weapon, run back to the boss to deal with the upcoming Mind Controls. You should have already killed your adds by this point.
- 0:43 Mind Control. After that, your team of three baits the next weapon. This time, they should move individually and not as a group, so only one person has to run out of the weapon.
- 1:02 Weapon.
- 1:13 Empowered Whirling Corruption. You should try to avoid getting this if possible. If you do, your tanks can kite the small Sha adds until the phase transition and your DPS can push the boss into the next phase. If you play this Whirling Corruption “correctly”, you’ll likely also get another Weapon or a Mind Control afterwards, and everything will be delayed significantly.
As soon as Garrosh starts his roleplay, you no longer need to deal damage. Save your trinket procs and use the following 30 seconds to catch your breath and prepare for the next phase.
Phase 4
In Phase 4, you will be teleported to Stormwind, and Garrosh will have reached his ultimate form. He retains his massive tank damage.
This phase is only active in Heroic Mode. From your starting position, pull Garrosh to the right, towards the edge of the arena. Voids will soon appear there,
at which point you should pull the boss to the other side of the arena.
Garrosh has healed himself up to 60 % HP (350 million) one last time and has completely new abilities. He gains
one energy point per second by default. Mismanaging abilities adds more energy to him. At 100 energy, he casts “Manifest Rage” (see below).
Ability: Malice
To handle this ability, the player with the circle will not move, and all players will gather in the circle and stand at its edge. Players who get the Malicious Blast will immediately run out of the circle until their debuff expires and then re-enter it.
Immunities remove the debuff. However, while you have an immunity active, you do not count as a target!
Ability: Bombardement
The voids remain in place for some time.
Ability: Manifest Rage
Your task during this phase is to continuously manage the Malice and, during each Bombardment,
create an Iron Star to interrupt the next Manifest Rage. A Monk tank is
best suited for kiting the Iron Star. Garrosh has no tank debuff in this phase and can be tanked by a single tank.
The following sequence begins with the casting of the first Malice after approximately 13 seconds into the phase.
- 0:00 Malice. You don't have anything else to do here yet, so you can take your time with it. Pull the boss to the right, to the edge of the arena. As a raid, you should always stay behind the boss, except during the brief moments when you switch sides of the arena due to the Bombardment.
- 0:31 Malice.
- 0:41 Bombardment. It may briefly overlap with the final ticks of the previous Malice. Have two players with cooldowns intercept the final ticks. Pull Garrosh to the other side of the arena to avoid the voids. Designate four players to create an Iron Star by standing together. The player affected by Malice, the two designated soakers, and one additional player are suitable for this. Immediately spread out again afterwards to prevent a second Star from appearing during the next Clump Check. Your Monk tank (or whoever is kiting) should position themselves next to the Star’s impact point and kite it across the arena. A large circle should suffice so that you arrive at the boss with good timing once he reaches 100 % energy.
- 1:01 Malice.
- 1:22 If you haven't made any mistakes and Garrosh hasn't gained 5 or more energy from Malice, the boss should reach 100 energy for the first time approximately 1:22 minutes after the first Malice and a total of 100 seconds after the phase begins. Kite the Star into him, preferably while he is still casting before the channeling begins. Have healer cooldowns ready for the impact. An Aura of Devotion prevents you from being unable to cast spells during the impact of the Iron Star.
- 1:32 Malice.
-
1:36
Bombardment. Here, Bombardment and Malice overlap significantly. This is the most critical
part of the phase. Identify players who can intercept the final Malice ticks in succession. Players
with immunities and major damage-reducing cooldowns like Dispersion are well-suited for this. Note that you should use the immunities
only to remove the debuff and cancel them immediately afterwards; otherwise, you won’t count as an interceptor.
Create another Star. - 2:01 Malice.
- 2:17 Bombardment.
Following this sequence, the boss should die, so you probably won't need to let a second Star crash into Garrosh.
The most critical part of this phase is when the Bombardment and the Malice run concurrently for a while.
Theoretically, you could also wait until the Bombardment at 2:17 to create a second Star, but then you won’t have one on hand
if the boss gets some extra energy. He will then cast Manifest Rage before you can even create the second star.
Kill Video
This video is our first kill from March 31, 2014, as seen from our Brewmaster's perspective.
Common Reasons for Wiping
- Warsong: Dealing too little damage right at the start of the fight or being too careless during the second Warsong.
- Energy: You will likely end up with over 25 energy a few times during the first transition phase. You can continue practicing afterwards, but you will die due to the large number of Empowered Whirling Corruptions.
- Iron Star: If the timing in Phase 4 isn’t right, specifically when the Iron Star hits Garrosh, you will likely die.
- Malice: If Garrosh gains additional energy, your usual timings will no longer work, and you will have to improvise.
TL;DR
- Tank Garrosh in the centre of the room.
- Assign one player to kill the two Siege Engineers in the west.
- Kill the first wave of adds immediately. Kick the second wave of adds into the Iron Star’s path, stun and root them there, and don’t let them hit you.
- Place the first weapon in the camp, the second at the throne.
- Assign interrupts for the Farseer Wolf Riders.
- Assign healing cooldowns for the first weapon and the two Iron Star explosions.
- Also in the following phases, apply DoTs to the weapons so they shrink in size.
- Assign one add to each player. Tanks + 1 DPS kill 1-6, the rest kills 7-9, and then splits up to kill 10-15. At the 7-9 group, run through the domes immediately without waiting. For the 10-15 groups, run through them after all the adds are dead. Position yourselves next to them first, then run in!
- Garrosh must remain below 25 energy, so you have a maximum of 24 seconds to kill the adds.
- First Whirling Corruption: Tank the boss in the centre of the room. After that, the boss remains at the Mind Control Gathering Point throughout the fight.
- Always run to the boss before Mind Control. The mind-controlled players should mostly be freed by the tanks alone.
- If necessary, assign healing cooldowns for the Whirling Corruptions.
- Tanks should taunt at 3 stacks.
- The tank collects the adds; no one else deals damage.
- At the end, group the adds together and kill them. Place Tremor Totems and use Fear Wards. Each player should only collect one orb.
- For the upcoming Empowered Mind Control: All players move to the Mind Control Gathering Point. Coordinate your interrupts.
- For the upcoming Empowered Whirling Corruption: Assign cooldowns and spread out at least 8 yards apart. Everyone kills their add and then helps others. Do not kill adds next to each other (8 yards) and kill them before they have hit you ten times!
- During the transition to P3, use Bloodlust as soon as Garrosh is at 10 % HP and starts talking.
- The following abilities must be addressed (all are empoered by now): Weapons, Mind Control, Whirling Corruption, Tank Debuff.
- Tanks will still taunt when they are at 3 stacks.
- A change to the tank debuff mechanic will cause additional raid damage.
- The active tank will take an extremely high amount of damage from Garrosh's melee attacks.
- The raid always gathers behind the boss.
- All DPS and healers stand inside the circle around the player who is affected by Malice. If you get a debuff, step out of the circle briefly and return once it expires. Assign players who can soak multiple consecutive attacks during the Bombardment if necessary. The player with the circle never moves, unless the Bombardment requires it.
- Assign four players who will generate an Iron Star during the Bombardment.
- Assign one person to kite the star and crash it into the boss when Garrosh reaches 100 energy. A Monk tank is well-suited for this role.
- No more tank swaps are needed.
Class Tips: Rogue
As a Combat Rogue, it’s especially important to manage your cooldowns wisely, particularly in Phase 1.
Adrenaline Rush is always paired with
Shadow Blades.
You’ll only target the Farseer directly; later, you’ll target the Empowered Mind Controls and your add during the Empowered Whirling Corruption.
For the rest, Garrosh is your main target during Blade Flurry.
My sequence of abilities looks like this. It includes a few unusual choices, but the reason is that the cooldowns become available again faster,
since otherwise, for example,
Killing Spree isn’t always ready at the right moment.
Assurance of Consequence
is required as a trinket for this to work out.
Use Tricks of the Trade on the tank before the fight begins.
Immediately after the start, use Shadowstep on Garrosh and Killing Spree
(without Slice and Dice!). Then build up 4–5 combo points and
activate Slice and Dice. The adds will spawn; use Blade Flurry + Adrenaline Rush to handle them.
Once the adds are dead, Killling Spree is ready again,
just before the Iron Star rolls in from the right. Your tanks should position Garrosh so that you don’t have to dodge.
Use Cloak of Shadows to immunize against the Star’s explosion.
Then the Farseer will arrive. Focus on him, activate Blade Flurry, and interrupt your assigned spell.
Immediately after that, adds will spawn again and Adrenaline Rush will be ready once more. Activate Blade Flurry and use Killing Spree as soon as it’s ready,
even if Adrenaline Rush and Shadow Blades are still active! Shortly before or after your Killing Spree, Garrosh will perform his Warsong
and buff the adds. Keep an eye on them and activate
Evasion. As a melee, it’s a dangerous place to be.
Make sure no add attacks you from behind. Sometimes a knockback of one of your teammates goes wrong or an add chases the player killing the Engineer,
so that adds might come back from diagonally behind.
Use Cloak of Shadows again during the Star's explosion.
Garrosh should now be preparing for the first transition phase. Let the ranged DPS handle the remaining adds and use Blade Flurry
if any are near the boss. Also use Preparation
and Evasion again if necessary. Make sure to get Killing Spree ready again, as you’ll save that for the adds during the transition phase.
It’s best to carry over a few combo points into the transition phase using Redirect
and use them on an add in the hallway. Use Tricks of the Trade on one of the tanks. You’ll use Killing Spree on the group assigned to you in the back.
During Garrosh’s AoE phase, you can use Cloak of Shadows at random to support your healers; then you’ll take no damage from either the direct AoE strike
or the general AoE.
Phase 1 requires very precise execution of the sequence described above, and it will likely take a few attempts to optimize it.
In the other phases, Garrosh is virtually the only target, and you should save either Killing Spree or Adrenaline Rush
to kill your add during Empowered Whirling Corruption. If you ever forget this, keep at least 10 combo points ready-to-use with Redirect.
From now on, you’ll use Cloak of Shadows to avoid taking damage during the Whirling Corruptions and to remove the Malice debuff in Phase 4.
If you’re at the end of Phase 3 and Garrosh has already triggered Phase 4, only continue attacking Garrosh if
Killing Spree or Adrenaline Rush wouldn’t be ready otherwise, so as not to trigger an unnecessary trinket proc.
If you happen to not receive a damage-reducing debuff during the transition phases, use
Feint combined with
Elusiveness.