Quick Facts
Introduction
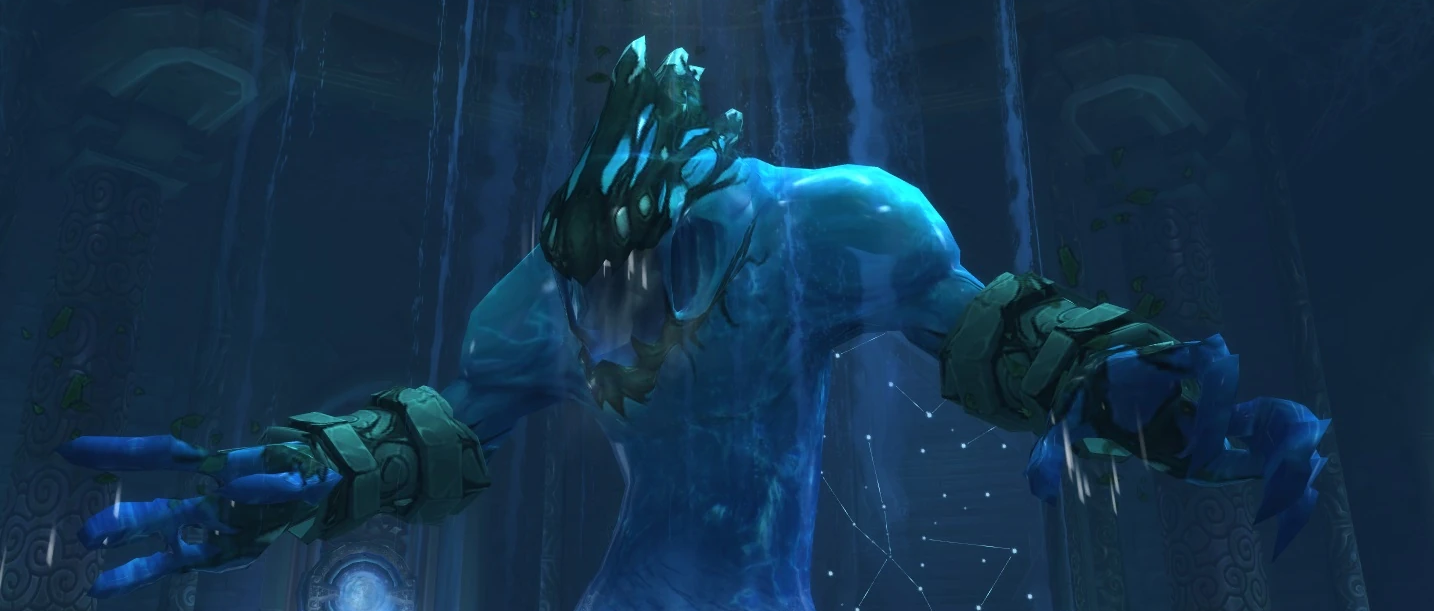
Immerseus is the opening boss in the Siege of Orgrimmar and, as such, poses little of a challenge.
The fight consists of two alternating phases. In Phase 1, you must remove stacks from the boss, kill Sha adds, and reduce the boss's HP to 1.
In Phase 2, the boss disappears, splits into multiple blobs, and you must defeat those to reduce his corruption level, his alternative health bar.
Each blob killed or fully healed in Phase 2 permanently reduces the boss’s corruption by 1. At the start of each Phase 1, his health percentage
matches his remaining corruption. The boss does not die until the end of Phase 2,
once his corruption has been reduced to 0 by a total of 100 blobs that have been dealt with.
As with many bosses, it’s possible to play this fight with three healers during progression. In Phase 2, you won’t need to worry as much about keeping a healer within range at all times then. There are also many healer blobs towards the end of the fight, and for this reason, we recommend three healers for the first few kills of this boss. Later on, you’ll have to decide whether more damage or more healing will result in a faster kill.
You'll probably end up solo-tanking the boss very soon, but for the first kill, it's advisable to use two to be safe. When solo-tanking, your tank will be tanking both the boss and the Sha adds at the same time and should expect to receive two tank debuffs. For the Corrosive Blast ability, the tank will need to turn the boss away from the group.
Phase 1: Tears of the Vale
Positioning
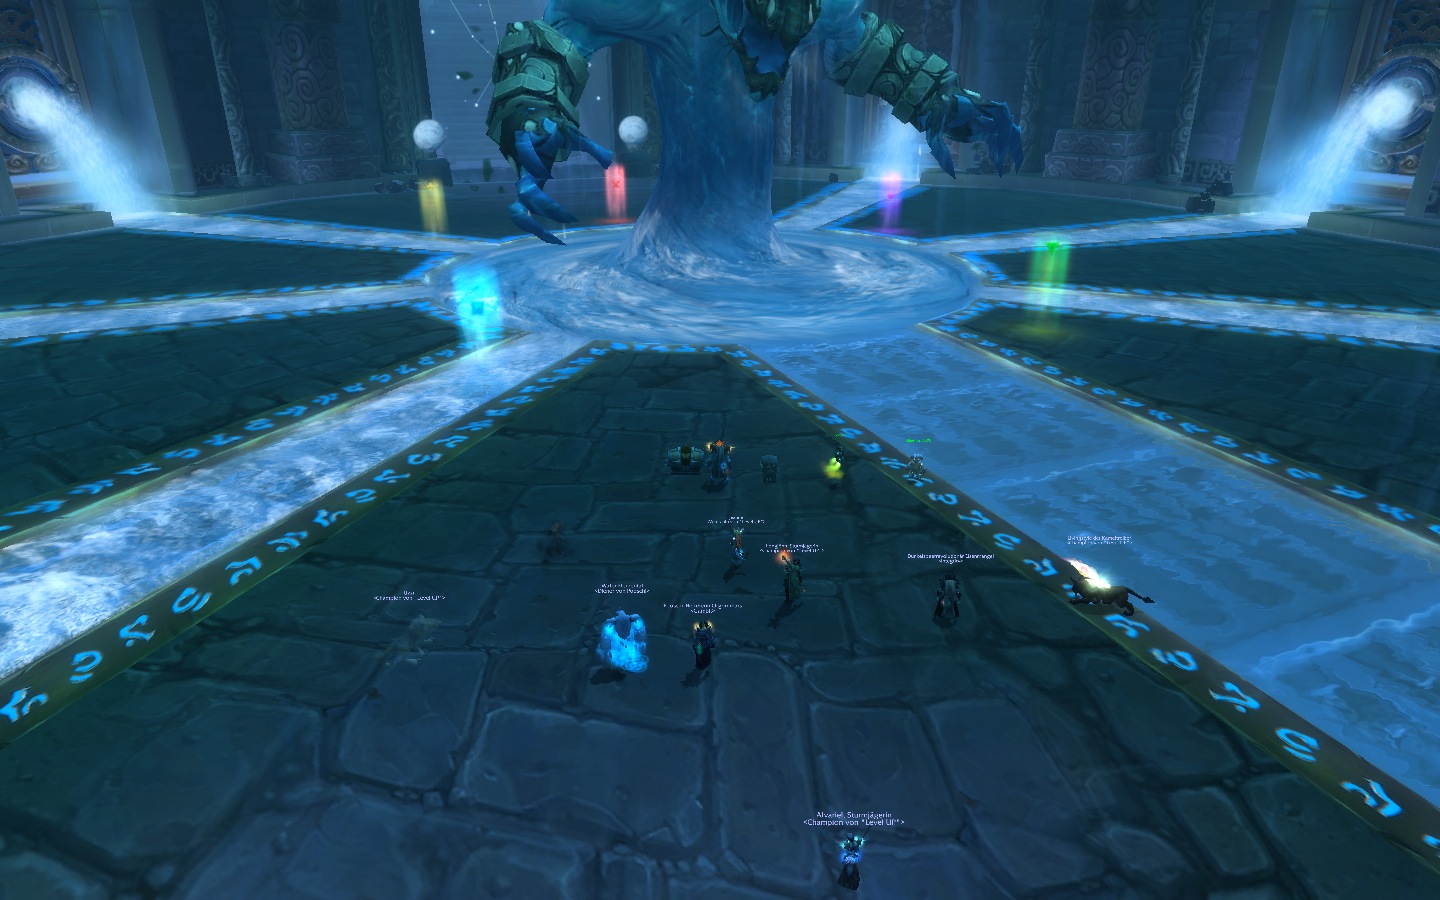
Have the tanks tank the boss at the blue marker and make sure you don't stand there as well during Phase 1,
because the frontal, cone-shaped
Corrosive Blast is deadly for non-tanks.
Position yourselves around the green marker and make sure everyone is within range of the healers.
The tank who is not currently active will tank the Congealed Shas in a void-free area near the green marker.
You can step into the channels of shallow water throughout the entire fight; they do not cause any damage.
The goal of each Phase 1 is to reduce the boss's health to 1, thereby triggering Phase 2.
Ability: Sha Bolt
Ability: Swirl
If the Swirl starts very close to the right of the group or even right in the group, the group can take a few steps to the right to leave the Swirl that forms shortly thereafter to the left.
Ability: Corrosive Blast
Note: The tooltip above says 200 %, but that is likely still an error on Wowhead’s part; according to the PTR compendium, it is 300 %.
Of course, a tank with cooldowns can take a second Blast.
Heroic Ability: Swelling Corruption
To bring Immerseus down to 1 HP, you have no choice but to remove the buff: If you attack Immerseus with single-target special abilities while this buff is active, it decreases by one stack and the player receives a stackable and dispellable six-second debuff that ticks each second.
With each additional stack, the debuff damage increases drastically, so stop your damage to Immerseus after 4 stacks at the latest.
Approximate damage per stack per second:
- 1: 3,000
- 2: 11,000
- 3: 29,000
- 4: 67,000
- 5: 117,000
Both healers and the add tank should remove a few stacks, too.
Furthermore, every time a stack is reduced, a Congealed Sha spawns that must be tanked. At the start of the fight, there are a lot of adds that should be killed quickly. The adds have approximately 1.3 million health.
In 10-man, using the same strategy will quickly result in seven or more debuff stacks, and you will die without immunities or dispels.
Back then, it wasn’t uncommon for 25-player raids to kill this boss on nearly their first attempt, while 10-player raids needed 10–20 attempts.
Phase 1: Breakdown
The following is a rough timeline of the abilities during the first Phase 1, i.e. immediately after the fight begins.
Because the boss has less health and corruption at the start of each subsequent P1, the sequence is also getting shorter.
The fight is won in Phase 2; Phase 1 is merely a necessary evil.
- 0:05 Spread out across the entire P1. The first voids are starting to form under players. Place them closely to each other.
- 0:10 The boss gains 50 debuff stacks.
- 0:13 The current tank receives the tank debuff - taunt! The former boss tank is now tanking the Sha adds.
- 0:24 The Swirl is about to start. Use healer cooldowns if it reaches the group.
- 0:48 The second Corrosive Blast hits the tank. Depending on your damage to the boss, this may not happen, and the boss proceeds to the second phase.
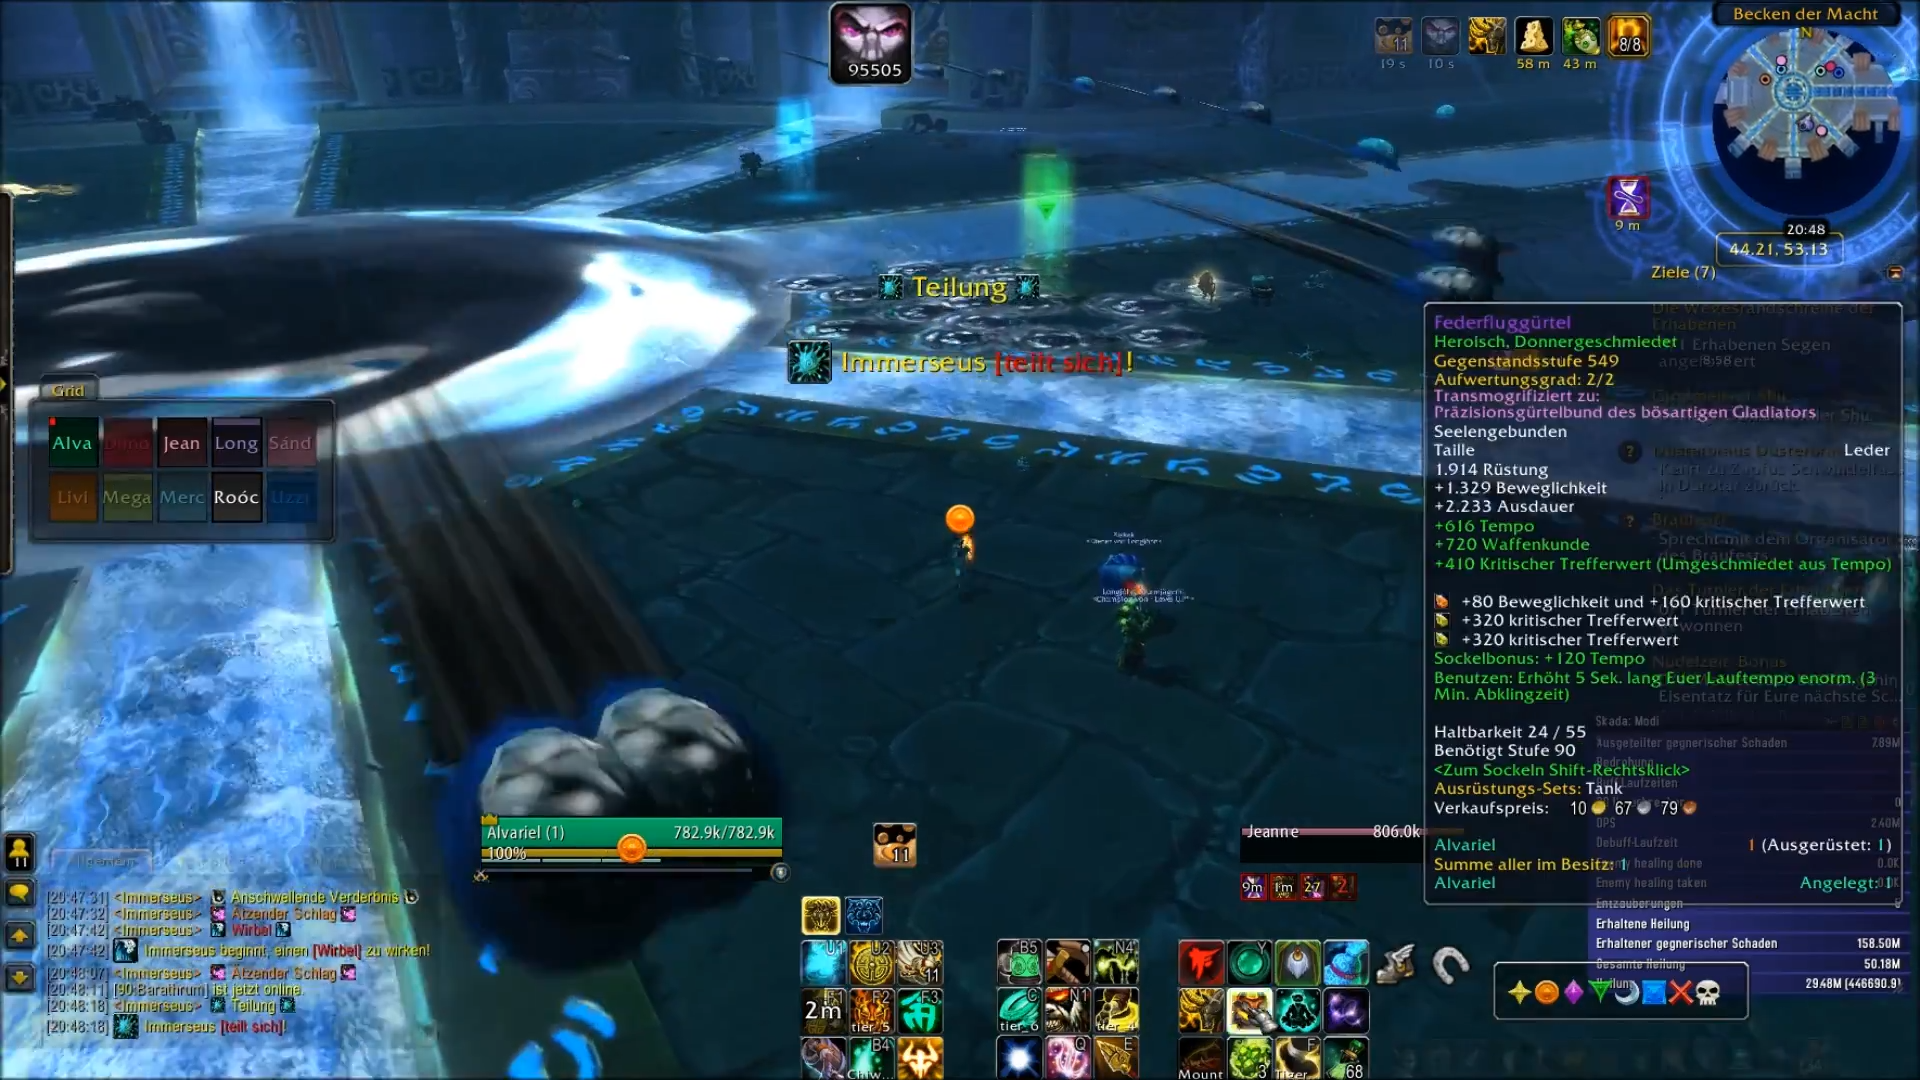
Phase 2: Split
The boss retreats into the large pool, and blobs start flying to random positions along the edge of the room, which then move relatively
quickly towards the pool in the centre of the room.
Every blob that is killed or fully healed during this phase reduces the boss's health, corruption, and debuff stacks in all subsequent P1!
The boss fight is over when the boss’s corruption is at 0, i.e., when a total of 100 blobs have been
dealt with in P2. Then he dies at the end of P2.
At the start of the fight, when the boss still has more corruption, more DPS adds will spawn; later on, more healer adds will spawn.
Phase 2 ends after all remaining adds have reached the pool in the centre.
You can survive his berserk (10 minutes). During berserk, the pool in the centre of Phase 2 turns red and deals extreme damage.
However, if the boss were to die after this phase, you can use cooldowns to survive until the phase ends.
Heroic Ability: Sha Pool
Add: Sha Puddle (DPS)
Each add killed permanently reduces the boss’s corruption and HP by 1 % at the start of P1.
If an add reaches the pool in the centre of the room, it disappears and deals approximately 90 k damage to the entire raid via Erupting Sha.
The adds can be slowed, rooted, and stunned. If you are within 10 yards of an add when it dies, damage dealt to other adds is increased by 25 % for a short time.
Add: Contaminated Puddles (Healers)
Healers can really go all out here, since when a blob is fully healed, they regain 75,000 mana within a 10-yard radius of the blob and gain 75 % more healing on blobs for a short time (stackable). So you can heal very intensively even in Phase 1 and replenish your mana here.
The more health these adds have, the slower they move.
Healers should split up on two sides so that all players always have a healer within range, since AoE damage keeps coming in.
Like the DPS blobs, incompletely healed blobs deal approx. 90 k damage upon reaching the pool via Erupting Sha. Fully healed blobs also deal damage: approx. 40 k from Erupting Water.
You can see this bug in action in our kill video. Shortly after 8:45, our Discipline Priest uses Leap of Faith on an add, and starting at 9:00, you can see how an add comes to a halt next to the yellow world marker and, fortunately, can be pulled into the pool by our Druid using Symbiosis.
Kill Video
This video is our first kill from September 26, 2013, as seen from our Brewmaster's perspective.
Common Reasons for Wiping
- Boss Positioning in Phase 1: The tank turns the boss towards the raid during Corrosive Blast.
- Debuff in Phase 1: The ability gets ignored, causing too many stacks.
- Swirl in Phase 1: Combining Swirl with avoidable damage sources.
- Healer Positioning in Phase 2: The healers are not well-distributed around the room.
TL;DR
- The active tank stands at the blue marker (no one else!). All other players are distributed around the green world marker, where the adds are also tanked. Keep a distance of at least 5 y to your teammates.
- Place voids next to each other to save space.
- Stop at 4 debuff stacks or use immunities.
- Only dodge the clockwise-rotating Swirl if it requires minimal movement; otherwise, use cooldowns.
- Run to your assigned position and heal or kill the adds as best you can.
- Keep shrinking the pool in the centre by stepping into it. Your tanks should be assigned to this task.
- Healers: Stand next to your adds (10 y) while healing them to full health for a 75,000 mana gain and increased healing on them.
- Tanks/DPS: Stand next to your adds (10 y) while killing them for a damage buff on blobs.
Class Tips: Rogue
All damage in this fight is magic damage, so it can be avoided using
Cloak of Shadows.
The most helpful use is to neutralize the Swirl with it,
since your healers will be stressed.
Swelling Corruption is not removed,
but it does not deal damage while Cloak of Shadows is active and does not gain stacks.
Feint paired with
Elusiveness also has great potential, as there are many AoE abilities.
Class Tips: Priest (Discipline)
Think about using Spirit Shell right at the start of the fight; this will allow you to mitigate the initial damage from the voids and the debuffs on the players. Another great opportunity to use it would be before the Swirl, but this doesn’t happen predictably.
During Swelling Corruption, help your raid by removing a few of the boss's debuff stacks by casting a spell on him.
You can use almost as much mana as you want, because if you heal a blob to full in Phase 2 and stand next to it, you'll get 75,000 mana back, plus stackable healing on blobs. To heal many blobs simultaneously towards the end of the fight, use Halo. This is also great as extra absorption/healing for the Swirl. If a blob that hasn’t been fully healed almost reaches the centre, you can pull it back with Leap of Faith or use it to pull a stuck blob into the pool.
Addendum for Those Interested in Mechanics
The following is a description of how health, corruption, and buff stacks behave in Phase 1, and how the number of adds in Phase 2 is determined.
The fight begins with the boss at 100 % HP and 100 corruption. For every two points of corruption, the boss gains one stack of Swelling Corruption, for a total of 50 stacks, which must be removed using single-target special abilities.
In Phase 2, 15 DPS adds and 5 healer adds spawn at 100 corruption. The more corruption that has been removed from the boss during the fight,
the more healer adds and fewer DPS adds will appear.
The boss always starts Phase 1 with a health percentage equal to his corruption points.
In our kill video above, we killed or fully healed 19 adds in the first Phase 2.
So he starts the second Phase 1 with 81 corruption and at 81 % health.
The Swelling Corruption now also only grants the boss 40 stacks of the buff.
In the next P2, fewer DPS adds and more healer adds spawn, corresponding to the corruption removed.
As a result, P1 will proceed faster and faster, and P2 will have more healer adds and fewer DPS adds, since the boss is missing a large number of corruption points compared to 100.